5 Rethread the needle with all four strands of thread. Take the needle back into the body so that the threads emerge some distance away from the knot; this is to avoid the knot untying and loosening the eyes. If needs be, patch and tidy (see here (#ulink_49762424-5d93-5f56-ac16-5aec9acf0305)) the little area where the knot is.
Sideways Method
1 Using an awl, drill a hole on either side of the face where the eyes are to sit. Thread a long needle with a good length of cotton and take it from one eye socket through to the one on the other side.
2 Unthread the needle and put an eye on to one of the cotton strands. Rethread the needle and take the needle into the socket, bringing it out at a point behind the head to ensure that the eye is sitting neatly in the socket.
3 Repeat on the other side, bringing the cotton out at the same point.
4 Pull the strands tight, without breaking them, so that the eyes sit snugly in the face. Tie off the strands, rethread them on to the needle and take the needle back into the body, bringing them out some distance away from the knot, as for the front-facing method. If needs be, patch and tidy the little area where the knot is.
Adding Beaks
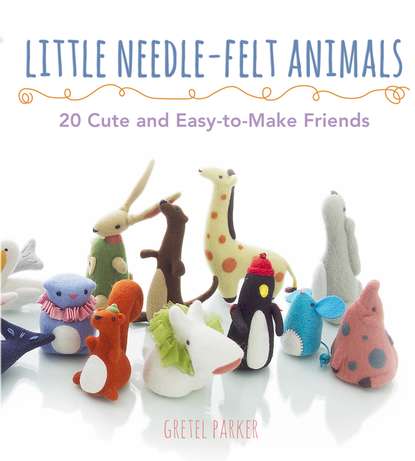
Roly-poly Robin (#litres_trial_promo) and Marching Penguin (#litres_trial_promo) both have small, pointy beaks. The technique to make beaks can be quite fiddly, so use a spare needle as a guide. This is a great way to get any tiny beak made – simply adjust the amounts of wool to suit the bird you’re working on.
1 Position a guide needle in the spot where the beak is to go. Take a very small amount of wool and, using another needle, anchor one end of the wool into the body.
2 Wind the wool around the guide needle and carefully stab at it until the beak is strong enough that you can remove the guide needle.
3 Finish firming up until you have a nice pointy beak. How easy was that?
Stitching Noses
1 To stitch a nose, preferably use thick cotton or a waxed thread. Thread a long needle and knot one end of the thread. Take the thread in at the side of the face, a little distance from where the nose is to be.
2 Make four to five stitches where you want the nose to be. Don’t pull the thread too tight in the felt or the stitches will be distorted. They should just nestle snugly together.
3 Take the thread out at a point away from the nose and snip off carefully.
Making Ruffs
Ruffs add extra cuteness. You can make a ruff from ribbons, lace or textiles, but bear in mind that you will need at least four times as much material as the circumference of the neck. Here I have used wire-edged ribbon, which holds the creases nicely.
1 Take a length of thread and begin creasing the ribbon into a concertina. As you work, catch the non-wired side on a long needle and hold it on the needle until you have finished.
2 Remove the needle and tie the ruff securely around the neck of your creature, wire edge on the outside. Rethread the needle with the loose thread ends and take the needle down into the body, so that the ruff is fixed in place.
Attaching Seed Beads
Seed beads (or any other kind of bead) are another great way of decorating a project. Use invisible thread or one that closely matches the colour of the bead. Make sure you have a long length of thread, so that you don’t have to keep rethreading.
Sewing on Clips
Clips can turn any small bird or creature into an instant decoration. Crocodile clips come in various sizes. When sewing them on, make sure the tooth side is flush to the body to give the thread something to grip to: if you try to sew over the flat side, it will slide out.
Вы ознакомились с фрагментом книги.
Для бесплатного чтения открыта только часть текста.
Приобретайте полный текст книги у нашего партнера: