
Handwork in Wood
Of what is left, a good part goes into the grinder or "hog," Fig. 53, which chews up all sorts of refuse into small chips suitable for fuel to supplement the sawdust if necessary. Band-saws make so little dust and such fine dust that this is often necessary.
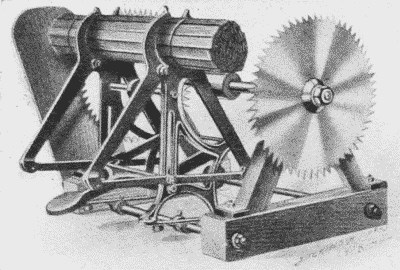
Fig. 51. Combination Lath-Binder and Trimmer. With this machine the operator can trim the bundles of lath simply by tilting the packing frame over from him causing the bundles to pass between the saws, thereby trimming both ends at one movement.
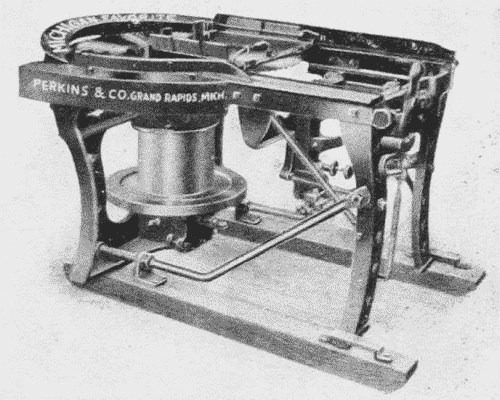
Fig. 52. Hand Shingle-Machine. This machine is used in Sawmills in which it is desired to utilize slabs and trimmings by sawing shingles therefrom, or to saw shingles from prepared bolts.
If there is any refuse that cannot be used at all it goes to the scrap-pile, Fig. 54, or to the "consumer," the tall stack shown in Fig. 37, see p. 33.
Boards ordinarily sawn from logs are "slash-sawn," i. e., they are tangential or bastard, each cut parallel to the previous one. By this process, only the central boards would be radial or "rift" boards.

Fig. 53. Edging grinder or Hog. It cuts any kind of wood into coarse or fine chips suitable to be handled by chain conveyor or blower.
But, for a number of reasons, radial boards are better. They warp less because the annual rings cross the board more evenly. Yellow pine flooring that is rift-sawn is more valuable than slash-sawn, because the edge of the annual rings makes a more even grain, Fig. 55. Where slash-grained flooring is used, the boards should be laid so that the outside of each board will be up in order that the inner rings may not "shell out."
In sawing oak for valuable furniture or trim, the log is first "quartered" and then the quarters sawn up as nearly radially as is desired. There are various methods of cutting quartered logs, as illustrated in Fig. 56.
In making staves for water-tight barrels, it is essential that they be cut radially in the log, in order that the staves be as non-permeable to water as possible.

Fig. 54. Scrap-Pile. Oscilla. Georgia.

Fig. 55. Slash-Grain and Comb-Grain Flooring.
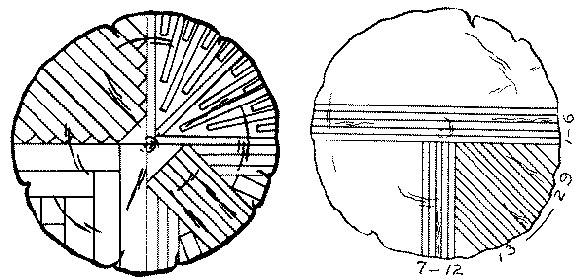
Fig. 56. Methods of Sawing Quartered Logs.
SAWMILLING
References4
Trout, Cassier 11: 83, 184.
Woodcraft 5: 56, May '06.
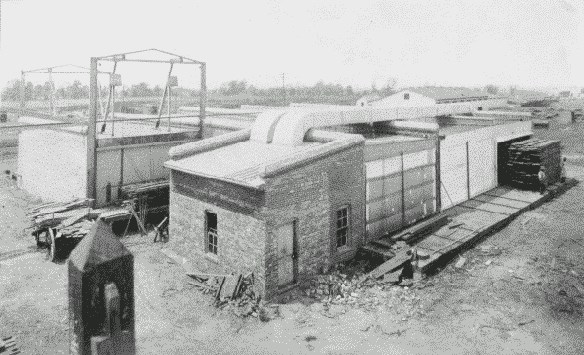
Fig. 57. Lumber-Kiln.
Chapter III.
SEASONING
The seasoning of wood is important for several reasons. It reduces weight, it increases strength, it prevents changes in volume after it is worked into shape, and it prevents checking and decay. Decay can also be prevented by submergence and burying, if by so doing logs are kept from fungal attacks. The piles of the Swiss Lake dwellings, which are in a state of good preservation, are of prehistoric age. Wood under water lasts longer than steel or iron under water. But for almost all purposes wood has to be dried in order to be preserved. The wood is cut up, when green, to as thin pieces as will be convenient for its use later, for the rate of drying depends largely upon the shape and size of the piece, an inch board drying more than four times as fast as a four inch plank, and more than twenty times as fast as a ten inch timber.
There are various methods of seasoning:
(1) Natural or air-seasoning is the most common, and in some respects the best. In this method, the wood is carefully and regularly piled in the seasoning-yard, so as to be protected as far as possible from sun and rain, but with air circulating freely on all sides of the boards, Fig. 47, see p. 38. To accomplish this, "sticking" is employed, i. e., strips of wood are placed crosswise close to the ends and at intervals between the boards. In this way the weight of the superposed boards tends to keep those under them from warping. The pile is skidded a foot or two off the ground and is protected above by a roof made of boards so laid that the rain will drain off.
Fire-wood is best dried rapidly so that it will check, making air spaces which facilitate ignition, but lumber needs to be slowly dried in cool air so that the fibers may accommodate themselves to the change of form and the wood check as little as possible. Good air-drying consumes from two to six years, the longer the better.
(2) Kiln-drying or hot-air-seasoning is a much more rapid process than air-seasoning and is now in common use, Fig. 57. The drying is also more complete, for while air-dried wood retains from 10% to 20% of moisture, kiln-dried wood may have no more than 5% as it comes from the kiln. It will, however, reabsorb some moisture from the air, when exposed to it.
The wood of conifers, with its very regular structure, dries and shrinks more evenly and much more rapidly than the wood of broad-leaved trees, and hence is often put into the kiln without previous air-drying, and dried in a week or even less time.
Oak is the most difficult wood to dry properly. When it and other hardwoods are rapidly dried without sufficient surrounding moisture, the wood "case-hardens," that is, the outer part dries and shrinks before the interior has had a chance to do the same, and this forms a shell or case of shrunken, and often checked wood around the interior which also checks later. This interior checking is called honeycombing. Hardwood lumber is commonly air-dried from two to six months, before being kiln-dried. For the sake of economy in time, the tendency is to eliminate yard-drying, and substitute kiln-drying. Kiln-drying of one inch oak, takes one or two weeks, quarter-sawn boards taking one and a half times as long as plain-sawn.
The best method of drying is that which gradually raises the temperature of both the wood and of the water which it contains to the point at which the drying is to take place. Care is therefore taken not to let the surface become entirely dry before the internal moisture is heated. This is done by retaining the moisture first vaporized about the wood, by means of wet steam. When the surface is made permeable to moisture, drying may take place rapidly. Curtains of canvas are hung all around the lumber on the same principle that windows in newly plastered buildings are hung with muslin. The moisture is absorbed on the inner surface of the curtain and evaporates from the outer surface. Improvements in kiln-drying are along the line of moist air operation. In common practice, however, the moist air principle is often neglected.
There are two methods in operation, the progressive method and the charge method. In the progressive, the process is continuous, the loads going in at one end of the kiln, and out at the other, the temperature and the moisture being so distributed in the kiln, that in passing from the green to the dry end, a load of lumber is first moistened, then heated, and finally dried out. In the charge system, the process is intermittent, one charge being removed before a new one is admitted. This gives the best results with high grade lumber for special uses.
A modification of hot-air-seasoning is that which subjects the wood to a moderate heat in a moist atmosphere charged with the products of the combustion of fuel.
(3) Small pieces of wood may be effectively seasoned by being boiled in water and then dried. The process seems to consist of dissolving out albuminous substances and thus allowing freer evaporation. Its effect is probably weakening.
(4) Soaking in water is sometimes used as a good preparation for air-seasoning. Previous soaking hastens seasoning. River men insist that timber is improved by rafting. It is a common practice to let cypress logs soak in the swamps where they grow for several months before they are "mined out." They are eagerly sought after by joiners and carpenters, because their tendency to warp is lessened. Ebony is water-soaked in the island of Mauritius as soon as cut. Salt water renders wood harder, heavier, and more durable and is sometimes applied to ship timbers, but cannot be used with timbers intended for ordinary purposes, as the presence of salt tends to absorb atmospheric moisture.
(5) Boiling in oil is resorted to for special purposes, both for preservation and to give strength. For example, the best handscrews are so treated. The oil also prevents glue from sticking, the most frequent cause of injury to handscrews.
(6) There are a number of "impregnation" methods of preserving timber, and their practice is spreading rapidly. Of the various preservative processes, those using coal tar creosote and zinc chloride have proved most efficient. The purpose is to force the preservative into the pores of the wood, either by painting, soaking, or putting under pressure. Such impregnation methods double or treble the life of railway ties. It is now being used with great success to preserve electric wire poles, mine-props, piling, fence-posts, etc.
Wood preservation has three great advantages, it prolongs the life of timbers in use, reduces their cost, and makes possible the use of species that once were considered worthless. For example, the cheap and abundant loblolly pine can be made, by preservative methods, to take the place of high priced long-leaf pine for many purposes.
PRACTICAL SUGGESTIONS FOR STORING LUMBERUnder the hasty methods prevalent in the mill, very little wood comes to the shop well seasoned, and it should therefore be carefully stored before using, so as to have the fullest possible air circulation around it. Where the boards are large enough, "sticking" is the best method of storage, i. e., narrow strips of wood are placed at short intervals between the pieces which are piled flat. The weight of the boards themselves helps to prevent warping. Boards set upright or on edge are likely to be distorted soon. It is often wise to press together with weights or to clamp together with handscrews boards that show a tendency to warp, putting the two concave sides together. Then the convex side is exposed and the board may straighten thus: Fig. 58. By wrapping up small boards in paper or cloth in the intervals between work on them, they may be kept straight until they are assembled.
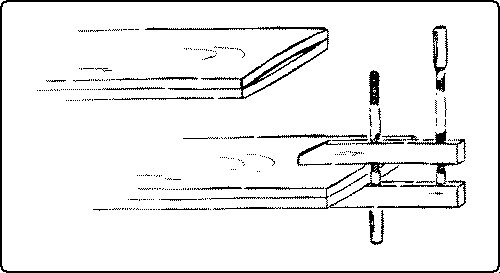
Fig. 58. Clamping up Boards to Prevent Warping.
Another precaution to take is to be sure to plane both sides of a board if either is planed, especially if the board has been exposed to air-drying for some time.
WOOD MEASUREMENTSLumber is a general term for all kinds of sawn wood. Logs may be sawn into timber, that is, beams and joists, into planks, which are 2" to 4" thick, or into boards which are from ¼" to 1¾" thick. These may be resawn into special sizes.
Lumber is measured by the superficial foot, which is a board 1" thick, 12" wide, and 12" long, so that a board 1" thick, (or ⅞" dressed) 6" wide and 12' 0" long, measures 6' B. M. (board measure). Boards 1" or more thick are sold by the "board foot" which is equivalent to 12" square and 1" thick. Boards less than 1" thick are sold by the square foot, face measure. Dressed lumber comes in sizes ⅛" less than sawn lumber. Regular sizes are:
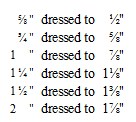
Any of these may be dressed down to thinner boards, or resawn on a special band-saw.
In ordering it is common to give the dimensions wanted, in the order of thickness, width, and length, because that is the order in which dimensions are gotten out. E. g.:
6 pcs. quar. oak, ⅞" × 6" × 3'0"
2 pcs. quar. oak, ¾" × 7½" × 15"
If a piece wanted is short the way the grain goes, the order would be the same, thus: ¾" × 11" (wide) × 6" (long). That is, "long" means the way the grain runs. It is always safe to specify in such a case. It is common when small pieces are ordered to add one-quarter to the cost for waste.
In large lots lumber is ordered thus: 800' (B. M.) whitewood, dressed 2 sides to ⅞", 10" and up. This means that the width of any piece must not be less than 10". Prices are usually given per "M," i. e., per 1000 ft.: e. g.: basswood may be quoted at $40.00 per M.
When thin boards are desired it is often economical to buy inch stuff and have it resawn.
Some lumber is also ordered by the "running" or lineal foot, especially moldings, etc., or by the piece, if there is a standard size as in fence-posts, studs, etc. Laths and shingles are ordered by the bundle to cover a certain area. 1000 4" shingles (= 4 bundles) cover 110 sq. ft. with 4" weather exposure. 100 laths (1 bundle) each ¼" × 1½" × 4'0" cover about 150 sq. ft.
There are several methods of measuring lumber. The general rule is to multiply the length in feet by the width and thickness in inches and divide by 12, thus: 1" × 6" × 15' ÷ 12 = 7½ feet. The use of the Essex board-measure and the Lumberman's board-measure are described in Chapter 4, pp. 109 and 111.
THE SEASONING AND MEASURING OF WOODReferences5
seasoning.
For. Bull., No, 41, pp. 5-12, von Schrenk.
Dunlap, Wood Craft, 6: 133, Feb. '07.
For. Circ. No. 40, pp. 10-16, Herty.
Barter, pp. 39-53.
Boulger, pp. 66-70, 80-88.
Wood Craft, 6: 31, Nov. '06.
For. Circ. No. 139.
Agric. Yr. Bk., 1905, pp. 455-464.
measuring.
Sickels, pp. 22, 29.
Goss, p. 12.
Building Trades Pocketbook, pp. 335, 349, 357.
Tate, p. 21.
Chapter IV.
WOOD HAND TOOLS
The hand tools in common use in woodworking shops may, for convenience, be divided into the following classes: 1, Cutting; 2, Boring; 3, Chopping; 4, Scraping; 5, Pounding; 6, Holding; 7, Measuring and Marking; 8, Sharpening; 9, Cleaning.
1. CUTTING TOOLSThe most primitive as well as the simplest of all tools for the dividing of wood into parts, is the wedge. The wedge does not even cut the wood, but only crushes enough of it with its edge to allow its main body to split the wood apart. As soon as the split has begun, the edge of the wedge serves no further purpose, but the sides bear against the split surfaces of the wood. The split runs ahead of the wedge as it is driven along until the piece is divided.
It was by means of the wedge that primitive people obtained slabs of wood, and the great change from primitive to civilized methods in manipulating wood consists in the substitution of cutting for splitting, of edge tools for the wedge. The wedge follows the grain of the wood, but the edge tool can follow a line determined by the worker. The edge is a refinement and improvement upon the wedge and enables the worker to be somewhat independent of the natural grain of the wood.
In general, it may be said that the function of all cutting tools is to separate one portion of material from another along a definite path. All such tools act, first, by the keen edge dividing the material into two parts; second, by the wedge or the blade forcing these two portions apart. If a true continuous cut is to be made, both of these actions must occur together. The edge must be sharp enough to enter between the small particles of material, cutting without bruising them, and the blade of the tool must constantly force apart the two portions in order that the cutting action of the edge may continue.
The action of an ax in splitting wood is not a true cut, for only the second process is taking place, Fig. 59. The split which opens in front of the cutting edge anticipates its cutting and therefore the surfaces of the opening are rough and torn.
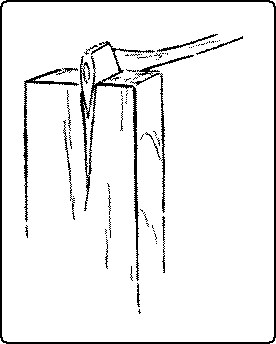
Fig. 59. Wedge Action.
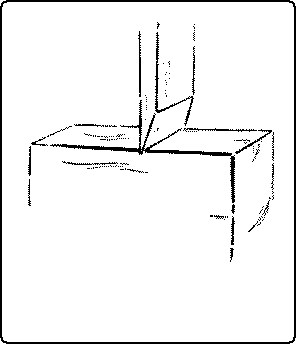
Fig. 60. Edge Action.
When a knife or chisel is pressed into a piece of wood at right angles to the grain, and at some distance from the end of the wood, as in Fig. 60, a continuous cutting action is prevented, because soon the blade cannot force apart the sides of the cut made by the advancing edge, and the knife is brought to rest. In this case, it is practically only the first action which has taken place.
Both the actions, the cutting and the splitting, must take place together to produce a true continuous cut. The edge must always be in contact with the solid material, and the blade must always be pushing aside the portions which have been cut. This can happen only when the material on one side of the blade is thin enough and weak enough to be readily bent out of the way without opening a split in front of the cutting edge. This cutting action may take place either along the grain, Fig. 61, or across it, Fig. 62.
The bending aside of the shaving will require less force the smaller the taper of the wedge. On the other hand, the wedge must be strong enough to sustain the bending resistance and also to support the cutting edge. In other words, the more acute the cutting edge, the easier the work, and hence the wedge is made as thin as is consistent with strength. This varies all the way from hollow ground razors to cold-chisels. For soft wood, the cutting angle (or bevel, or bezel) of chisels, gouges and plane-irons, is small, even as low as 20°; for hard wood, it must be greater. For metals, it varies from 54° for wrought iron to 66° for gun metal.
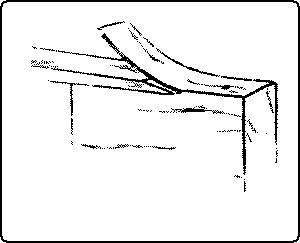
Fig. 61. Edge and Wedge Action With the Grain.
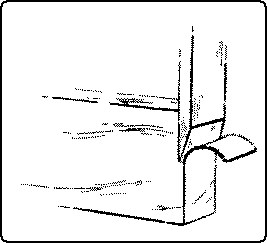
Fig. 62. Edge and Wedge Action Across the Grain.
Ordinarily a cutting tool should be so applied that the face nearest the material lies as nearly as possible in the direction of the cut desired, sufficient clearance being necessary to insure contact of the actual edge.
There are two methods of using edge tools: one, the chisel or straight cut, by direct pressure; the other, the knife or sliding cut.
The straight cut, Fig. 63, takes place when the tool is moved into the material at right angles to the cutting edge. Examples are: the action of metalworking tools and planing machines, rip-sawing, turning, planing (when the plane is held parallel to the edge of the board being planed), and chiseling, when the chisel is pushed directly in line with its length.
The knife or sliding cut, Fig. 64, takes place when the tool is moved forward obliquely to its cutting edge, either along or across the grain. It is well illustrated in cutting soft materials, such as bread, meat, rubber, cork, etc. It is an advantage in delicate chiseling and gouging. That this sliding action is easier than the straight pressure can easily be proved with a penknife on thin wood, or by planing with the plane held at an angle to, rather than in line with, the direction of the planing motion. The edge of the cutter then slides into the material. The reason why the sliding cut is easier, is partly because the angle of the bevel with the wood is reduced by holding the tool obliquely, and partly because even the sharpest cutting edge is notched with very fine teeth all along its edge so that in the sliding cut it acts like a saw. In an auger-bit, both methods of cutting take place at once. The scoring nib cuts with a sliding cut, while the cutting lip is thrust directly into the wood.

Fig. 63. Straight Cut.
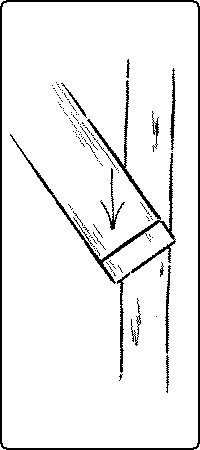
Fig. 64. Sliding Cut.
The chisel and the knife, one with the edge on the end, and the other with the edge on the side, are the original forms of all modern cutting tools.
The chisel was at first only a chipped stone, then it came to be a ground stone, later it was made of bronze, and still later of iron, and now it is made of steel. In its early form it is known by paleontologists as a celt, and at first had no handle, but later developed into the ax and adze for chopping and hewing, and the chisel for cuts made by driving and paring. It is quite likely that the celt itself was simply a development of the wedge.
In the modern chisel, all the grinding is done on one side. This constitutes the essential feature of the chisel, namely, that the back of the blade is kept perfectly flat and the face is ground to a bevel. Blades vary in width from 1⁄16 inch to 2 inches. Next to the blade on the end of which is the cutting edge, is the shank, Fig. 65. Next, as in socketed chisels, there is the socket to receive the handle, or, in tanged chisels, a shoulder and four-sided tang which is driven into the handle, which is bound at its lower end by a ferrule. The handle is usually made of apple wood.
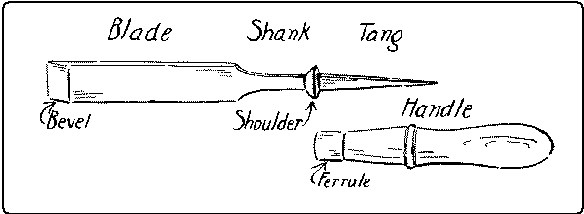
Fig. 65. Firmer-Chisel.
The most familiar form is the firmer-chisel, Fig. 65, which is said to get its name from the fact that it is firmer or stiffer than the paring-chisel. (See below.) The firmer-chisel is a general utility tool, being suited for hand pressure or mallet pounding, for paring or for light mortising.
Different varieties of chisels are named; (1) according to their uses; as paring-chisels, framing-chisels, mortise-chisels, carving-chisels, turning-chisels, etc.
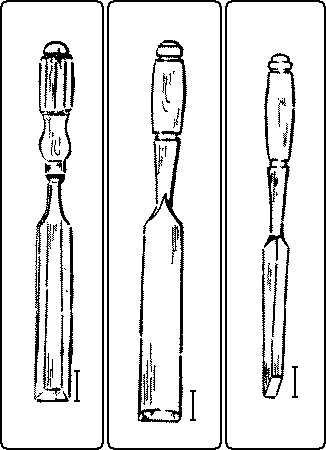
Fig. 66. Paring-Chisel. Fig. 67. Framing-Chisel. Fig. 68. Mortise-Chisel.
The paring-chisel, Fig. 66, has a handle specially shaped to give control over its movements, and a long thin blade, which in the best form is beveled on the two edges to facilitate grooving. It is intended only for steady pressure with the hand and not for use with a mallet.
The framing-chisel, Fig. 67, is thick and heavy and was formerly much used in house framing. It is usually made with the handle fitting into a socket on the shank, in order to withstand the shock of heavy blows from the mallet.
The mortise-chisel, Fig. 68, is made abnormally thick to give the stiffness necessary for levering the waste out of mortises.
(2) Chisels are also named according to their shapes: as, skew-chisels, corner-chisels, round-nosed chisels, etc.
The angle of the bevel of a chisel is determined by the kind of wood for which it is most used, hard wood requiring a wider angle than soft wood, in. For order to support the edge ordinary work, the bevel is correctly ground to an angle of about 20°. The chisel is a necessary tool in making almost every kind of joint. It may almost be said that one mark of a good workman is his preference for the chisel. Indeed an excellent motto for the woodworker is: "When in doubt, use a chisel".
In general, there are two uses for the chisel (1), when it is driven by a push with the hand, as in paring, and (2), when it is driven by blows of a mallet, as in digging mortises.
In relation to the grain of the wood, it is used in three directions: (1) longitudinally, that is with the grain, called paring; (2) laterally, across the surface, called cutting sidewise; (3) transversely, that is across the end, called cutting end-wood.

Fig. 69. Paring with a Chisel.
1. Paring. To remove shavings rapidly, the chisel is held flat side up, the handle grasped by the right hand, with the thumb pointing toward the shank, and the blade held in the left hand, as in Fig. 69. Held in this way great control can be exerted and much force applied. For paring the surface as flat and smooth as possible, the chisel should be reversed, that is, held so that the flat side will act as a guide. Held in this way the chisel has no equal for paring except the plane. Paring with the chisel is the method used in cutting stop chamfers. (See p. 185, Chapter VIII.) By holding the cutting edge obliquely to the direction of the grain and of the cut, the effective "sliding cut" is obtained, Fig. 64.

