The Times Beginner’s Guide to Bridge: All you need to play the game
South has a balanced hand with 13 points – he opens the bidding 1NT. With the opponents silent, North, who also has an opening hand, immediately thinks ‘game’. With no particular preference for a trump suit (his hand is also balanced), he opts for game in no-trumps. He therefore bids the game contract 3NT.
A more specific guide for when to go for game in the three desirable game contracts (3NT, 4♥ and 4♠) is if you and your partner together have 25 points (i.e. ten more than your opponents out of the total, 40). It doesn’t guarantee success, and you won’t always fail if you have fewer points, but it’s a useful guide.
must know
• The five game contracts are 3NT, 4♥, 4♠, 5♣ and 5♦.
• Avoid contracts 5♣ and 5♦.
• If you have an opening hand (12+ points) and your partner also has 12+ points, you should contract for game.
• Bid game (3NT, 4♥, 4♠) if your partnership has 25+ points.
When to go for game
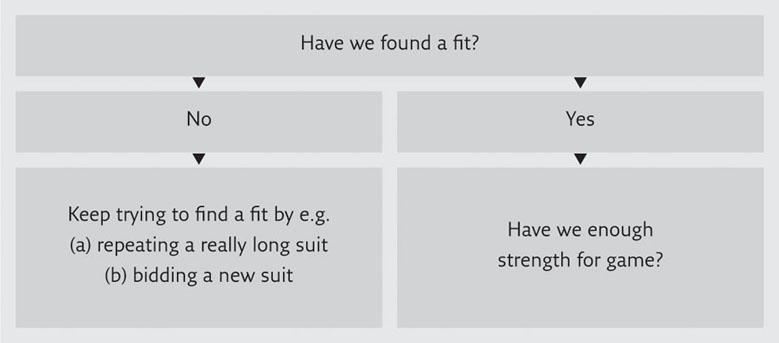
Bidding with your partner involves first trying to find a fit, then seeing whether you have enough points between you for game. This decision process is shown here:
Now let’s look at some sample pairs of hands (we’ll assume silence from the opponents). Note that ‘responder’ is bridge jargon for the opener’s partner.
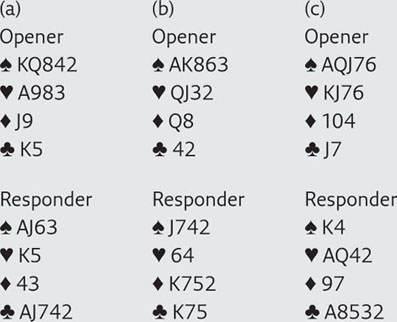
(a) Opener bids 1♠, so responder knows they have at least eight spades between them – a fit. Responder must now bid. There’s no point bidding clubs – it would only confuse matters when it’s obvious spades should be trumps. The only unresolved issue is how high to bid in spades, specifically whether or not to bid for game (4♠). Responder knows that opener has 12+ points (the minimum required in order to open the bidding), and responder has 13, thus the partnership has at least 25 points, which means that responder can go for game: she bids 4♠, a ‘jump’ from the previous bid 1♠. The bidding sequence is as follows, the underlined bid being the final contract:

(b) Opener bids 1♠. Again responder knows there’s a spade fit (opener must have four+ spades, and responder has four spades, so the partnership has eight+ spades). However responder has a relatively low point count, so should raise to 2♠. This conveys to opener that responder supports spades as trumps but her hand is only worth a minimum bid. With nothing to add to his opening bid, opener then passes. They’ve found their fit but lack the strength for game. The bidding sequence is:

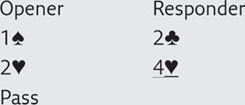
(c) Opener bids 1♠, which doesn’t reveal a fit to responder. She therefore tries her favourite (longest) suit at the lowest level possible, bidding 2♣. This suit doesn’t appeal to opener, but rather than repeat spades he offers a third choice of trump suit, hearts. Responder now knows they’ve found their fit (the partnership has at least eight hearts). She considers whether the values for game are present: she has 13 points, and her partner has advertised 12+ by opening, which is enough to bid a game contract (25 points are needed to go for game). Responder jumps to 4♥. The bidding sequence is:
must know
Don’t bid unnecessarily high when bidding a new suit. Try to find a fit as ‘cheaply’ as possible i.e. the bid you reach first as you work up the bidding ladder on p. 22 (the bid that requires the least number of tricks to make a contract). Then assess whether or not you have enough points to go for game.
Responding to a 1NT opener
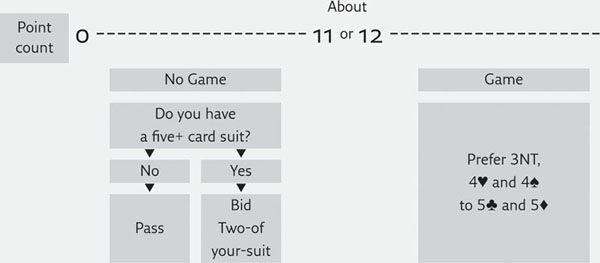
If your partner opens the bidding 1NT, as responder you should be happy because he’s described his hand very accurately: 12, 13 or 14 points and one of three balanced distributions (see the diagrams on p. 26). In most cases you’ll be in a position to place the final contract.
Strategy for responding to 1NT opener
Remember that opener will only rarely bid again, so you should assume (at this stage) that your bid as responder will end the auction.
Now consider how you’d respond to your partner’s 1NT opener when you hold the following cards:

(a) You know the partnership has enough strength for game (you have 25 or more points between you). With your balanced hand, your preferred bid is 3NT.
(b) You know the values for game are present. You also know there’s a heart fit (a 1NT opener can’t contain a void or a singleton so your partner must have at least two hearts, which makes at least eight hearts between you). The correct response is jump to 4♥.
(c) With such a weak hand there’s clearly no chance of going for game. However, leaving your partner in 1NT would be a mistake so you need to make a bid. Your hand is useless in no-trumps but may take a few tricks with diamonds as trumps, so bid 2♦. Your bid effectively removes your partner’s 1NT bid and is known as a ‘weakness take-out’. Your partner will know not to bid again (he’ll look on your bid as a rescue).
must know
• When your partner opens 1NT, as responder you must consider whether to make a trump suit or to stay in no-trumps, and whether to go for game.
• Responding Two-of-a-suit removes your partner’s 1NT opener and is known as a ‘weakness take-out’.
Responding to a suit opener
If your partner opens with One-of-a-suit, e.g. 1♥, you know that 19 is the highest point count they can have to open at this One level (see diagrams on pp. 29 and 30). This means that you, as responder, need a minimum of six points to have a chance of game (25 points in total are required for game).
Strategy for responding to One-of-a-suit opener
If you as responder have six+ points in total then you should keep the bidding open (note the difference between this and responding to 1NT, where the opener’s upper limit is 14 points).
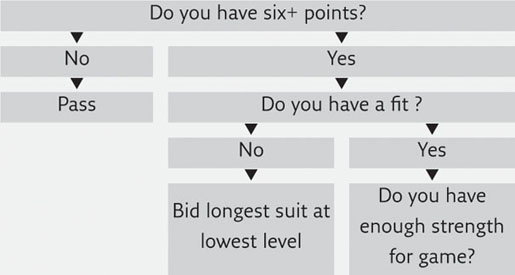
Now consider how you should respond to your partner’s 1♥opener if you hold the following cards:

(a) You have fewer than six points. The partnership doesn’t hold the 25 points for game, so you should pass. To bid would show (inaccurately) six+ points.
(b) You have plenty of points to respond, plus a fit for hearts. Also, the point count is high enough to go for game (13+12 = 25). You should jump to 4♥.
(c) You easily have enough points to bid, but no guarantee of a fit for hearts (opener may only have four hearts, in which case you’d need four to make the eight required for a fit). Instead you should bid your longest suit at the lowest level, and await developments: a bid of 1♠. This shows you have at least six points in order to bid and at least four spades to try for a fit (see the diagram on p. 31), and, by inference, you have fewer than four hearts.
must know
• The responder to a One-of-suit opener should bid if she has six+ points in her hand, and pass if she has fewer points than this.
• The opener of One-of-a-suit must bid again if his partner bids a different suit.
Bidding after an opponent’s opener
If you bid (or ‘call’) after the opponents have opened the bidding then you are ‘overcalling’.
Overcalling
Unlike opening, you don’t need 12 points to enter the bidding when overcalling, but you should only enter the bidding for a reason, i.e. when you have strong cards in a long suit. Sometimes you may be able to steal the contract from your opponents, or you may simply be aiming to cause them trouble by using up their bidding space (their opportunities to communicate with each other) or pushing them to make an unwise bid at too high a level.
The crucial difference in bidding an overcall is that where an opening bid and response only promise a minimum of four cards in the bid suit, an overcall guarantees a minimum of five cards. The corollary to this is that the overcaller’s partner only needs a three-card support to make the fit of eight cards (see the following diagram).
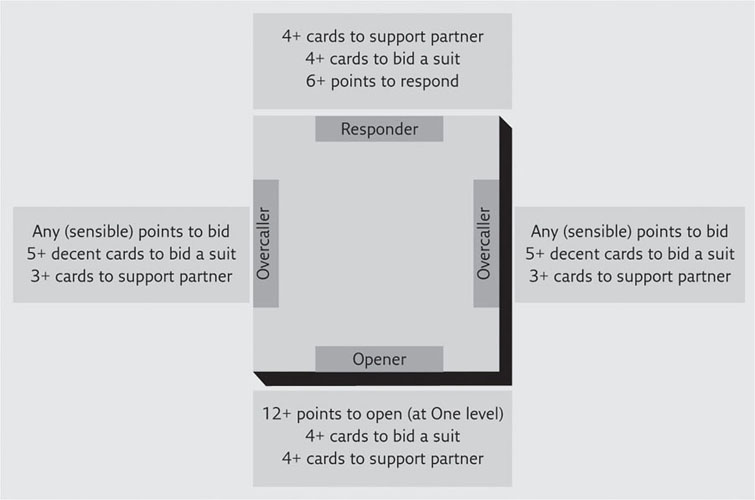
Note that both members of the overcalling side adhere to the same guidelines – it doesn’t matter if you’re bidding directly over an opening bid, or over the response.
Here are three sample hands that would make a 1♠ overcall following your opponents’ opening bid of 1♥ (or after the bidding sequence: 1♣, Pass, 1♥).

(a) and (b) are not particularly strong hands, but there’s everything to be gained by mentioning your spades in each case: it’s the highest-ranked suit (see pp. 8 and 22) and you may go on to make a contract. Even if it’s just a case of disrupting your opponents’ bidding, and ultimately defending, you’ll have helped your partner’s defence by indicating which suit to lead.
(c) is another clear overcall of 1♠. Note that an overcall is possible with opening bid values (12+ points).
must know
• An overcall in a suit indicates five+ decent cards in the suit.
• An overcall doesn’t guarantee that the overcaller has opening points (12 or more), but equally it doesn’t preclude them.
Doubling
The final bid in the bridge player’s arsenal is a double. When you bid ‘Double’ literally this means that you double the opposing contract because you think it will fail, and if you’re right you get more points for your side. However, the most frequent use for the double is something quite different: to ask your partner to bid in one of the unbid suits.
We’ll talk much more about the double in chapter 4 (see p. 126). For now, accept that the following hands (a, b and c) would double a 1♥ opener from the opposition:
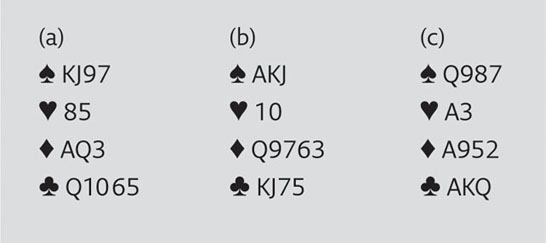
must know
If you bid ‘Double’ following an opening suit bid from the opposition this normally indicates you have an opening hand (12+ points) supporting all unbid suits, and it implicitly asks your partner to bid one of these other suits.
Play
Once the bidding has finished, as declarer you now need to make the required number of tricks to achieve your contract, or as a defender you need to stop declarer from doing this.
Playing our first deal in no-trumps
When there is no trump suit, in each round of play the highest card in the lead suit wins the trick. A player unable to follow suit cannot win the trick so must throw away a card in a different suit.
As declarer you must plan your strategy before you play from dummy at Trick one. First count how many tricks are ‘off the top’, i.e. how many you can make before losing the lead. Note that you don’t play out these ‘top tricks’ at this stage.
Let’s return to a previous example:
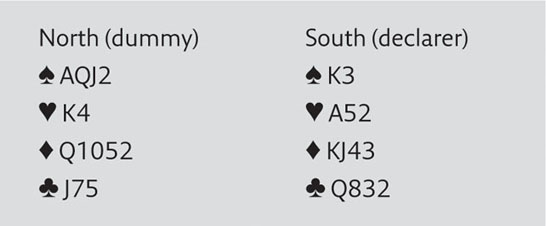
Between the two hands, declarer has four top spades (provided he plays his top cards in the right order) and two top hearts: a total of six. Note that he doesn’t have any top tricks in diamonds and clubs – he’ll have to lose the lead before establishing tricks in these suits. In the bidding he has contracted for 3NT (six plus three = nine tricks out of a total of 13) and he can now work out that he needs three extra tricks to win (six + three extra = nine). He has two options:
(a) To take the six top tricks (i.e. ♠AKQJ and ♥AK) straight away, then look around for the three more he needs. (b) To focus first on generating those three extra tricks. The wisest strategy on almost all deals (and particularly no-trumps) is (b). The two strategies can be likened to a tortoise and a hare.
Tortoise and hare
I often equate the choice of strategies in a bridge deal to a race between a tortoise and a hare. The hare loves to get off to a flying start; cashing his top tricks straight away. The tortoise, on the other hand, is happy to lose the lead early, knowing he’ll polish up later on.
In the example on p. 40, let’s see what happens to the hare. He cashes all his spades and hearts, then, unable to cash any more tricks, turns to diamonds. The difficulties arise because when his opponents win the lead – as they’re sure to with ♦A – they’ll go on to cash promoted low-card winners in hearts (and perhaps spades) with cards left over in their hands. Together with ♦A and ♣AK (tricks he has no choice but to lose), the hare will lose too many tricks and fail to make his contract. There’s no bonus for taking early tricks.
The tortoise, on the other hand, wins ♥K, then focuses on establishing the three extra tricks (additional to his six top tricks) needed for his nine-trick contract. He works out that these can all be made by forcing out ♦A. At trick two, he leads ♦Q (he could equally well lead ♦10, or ♦2 to ♦K/♦J). His opponents are likely to win ♦A on this trick; if they don’t, the tortoise’s ♦Q is promoted into a trick and he leads a second diamond to force out ♦A. The beauty of flushing out ♦A early on is that the tortoise retains control of the other suits. If his opponents decide to cash ♣A and ♣K, this will promote the tortoise’s ♣Q and ♣J. More likely, they’ll lead a second heart. The tortoise then wins ♥A and has three promoted diamond winners. All he needs to do is cash his four top spades without blocking himself, to give him his nine top tricks. He plays ♠K first (highest card from the shorter length) and leads ♠3 to ♠AQJ. Nine tricks and game contract made.
must know
Before play commences, as declarer you should:
• observe the very important etiquette of saying ‘Thank you partner’ as dummy tables her hand;
• count up how many top tricks you have (i.e. tricks you can make before losing the lead);
• work out how many extra tricks you need;
• go for those extra tricks as soon as possible. We have learnt two methods so far: (a) by force (flushing out opposing higher cards), and (b) by length (exhausting the opponents of their cards in a suit, enabling you to make tricks with cards you have left over).
Defending
You didn’t win the bidding and are defending. Here are some strategies you should adopt:
Opening lead
The opening lead is unique. It’s the only card you as defenders play without sight of dummy’s hand, as the lead card is always played by the player on declarer’s left before dummy tables her cards. Because the opening lead is a bit like a stab in the dark, you should stick to tried-and-tested ploys. Much depends on whether you’re defending against a trump or no-trump contract.
Defending against no-trumps
Against no-trumps, you should focus on length. If you can exhaust declarer and dummy of their cards in your longest suit, you’ll have small cards left over and these will be length winners. Your opening lead should therefore be a low card from your longest suit, or from your partner’s if she has bid.
Defending against trumps
The length strategy is far less powerful against a trump contract as declarer will simply trump you when he’s run out of cards in the lead suit. At the other end of the spectrum, leading a singleton (in a ‘side suit’, i.e. not trumps) is a powerful ploy. You can void yourself (run out of cards in the suit) in the hope that the suit will be played again and you can trump.
More common than the singleton is the ‘top-of-a-sequence’ lead: when defending against a trump contract, and you hold two or more high cards in a sequence (known as ‘touching’ high cards), lead with the top card in the sequence. For example, if you hold the ace and king in a suit, then it’s standard practice to lead with the ace; if you hold the king and queen, then lead the king; if you hold the queen and jack, lead the queen; if you hold the jack and ten, lead the jack; or lead the ten if you hold ten and nine. Thus, if you lead with the king and hold the queen, this puts you in a win-win position: your partner may hold the ace, in which case your king will win the trick; and even if the declarer or dummy takes the king with the ace you’ll have promoted your queen into a second-round winner.
Useful tip
You defend half of all contracts, and only declare a quarter of them, so learn to love defence – it’s a wonderful co-operative challenge.
After the lead
As you begin bridge, you’ll probably find defending to be the toughest part of the game. Your instinct may well be to throw down an ace or two, grabbing tricks quickly. This wasn’t the right strategy for the declarer (remember the hare), and nor is it the right strategy for defence. An ace is meant to catch a king, and not two low cards, as it is sure to do if you use it hastily.
Here are three of the most important factors to bear in mind when defending:
Trick target
Never lose sight of how many tricks you need to defeat the contract and stop your opponents scoring points towards a game (see pp. 221–2).
Observe dummy
Look for dummy’s weakest suit – e.g. one with three small cards.
Partner
Work out what kind of hand your partner holds: did she bid? What did she lead? Why did she lead what she led?
To remember this, ‘TOP’ stands for ‘Trick target’, ‘Observe dummy’ and ‘Partner’.
want to know more?
• The system of bidding assumed in this book is the English Standard ‘Acol’, the most prevalent in Britain. For more on different bidding systems, see p. 231.
• For more ways to make tricks, see pp. 78–89.
• For playing a deal in a trump suit, see pp. 84–9.
• For more on the opening lead and defence, see pp. 90–103.
Three basic deals
You may find it helpful to lay out all 52 cards and play through the following illustrative deals with open cards. When each card is played, turn it face down beside the hand, vertically if won by the partnership, and horizontally if lost.
Deal A
Dealer East
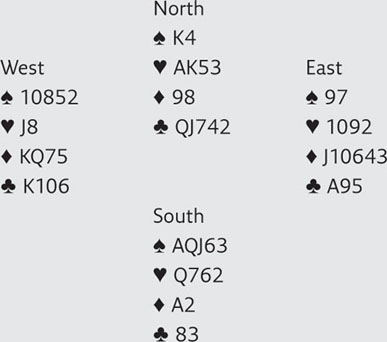
The bidding:
East deals, so is first to speak. Lacking 12 points, he says ‘No Bid’. The bidding moves clockwise to South, who, since the bidding has not yet been opened, also needs (at least) 12 points to bid. He has them. He opens One of his Longest Suit, One Spade. West passes – although he does not need 12 points to bid (now that the bidding has been opened), he should have a nice five-card suit (which he does not have). North can work out that the points for game (25) are present between the partnership. But there is no rush – for he does not know the trump suit. He simply bids his longest suit at the lowest level – Two Clubs – and awaits developments.
With East-West silent, South then considers what to do next. He knows that his partner does not particularly like his spades (no support); and he does not like his partner’s clubs. Rather than sing the same song twice and repeat the spades, he suggests a new alternative, hearts, knowing that his partner will realize he prefers spades – because he bid them first. Over his bid of Two Hearts, North perks up. The fit is found – South must have four+ hearts, giving a partnership total of the magic eight. It was not the first-choice trump suit for either player, but together, hearts are best.
It’s like partners in life: ‘I want to watch the football tonight.’ ‘Oh, I’d like to go to the movies.’ Eventually the two go out and have a meal together – neither of their first choices. But the best combined option – and delicious!
The one remaining issue is whether or not to go for game. Because North knows that the points for game (25) are present (he has 13 and his partner opened the bidding to indicate at least 12), the answer to that question is ‘yes’. North jumps to Four Hearts. Everybody passes – end of the bidding.
Here is the bidding sequence in full:

The play:
By bidding the trump suit – hearts – first, South is declarer. West (on South’s left) must make the opening lead, after which North lays out his cards (for he is dummy).
West has heard his opponents bid all the suits bar diamonds. This makes diamonds an intelligent choice of opening lead, likely to hit their weakness. Leading diamonds is still more attractive because West holds a king-queen combination in the suit. He leads the king of diamonds (top-of-a-sequence – indicating the queen), and will be very happy to see it win the trick (should his partner hold the ace), but almost as happy seeing it force out the ace and so promote his queen.
Declarer wins the ace of diamonds, and looks at his lovely spades. Before he can enjoy them (without the risk of them being trumped), he must get rid of (‘draw’) the opposing trumps. Because he has eight trumps, he can work out that the opponents hold five. He expects those five missing trumps to split three-two, in which case they will all be gone in three rounds. It does not matter in which order he plays his three top cards, so say that at Trick Two he leads to dummy’s king. When both opponents follow, he knows there are three trumps left out. He follows with dummy’s ace of trumps and, with both opponents following a second time (good!), he now knows that the opposing trumps have indeed split three-two. There is just one trump outstanding. If it was higher than all of his remaining trumps, he would leave it out. Because it is lower, however, he leads to his queen to get rid of it. Trumps have now been drawn, and note the method of counting (focusing only on the missing cards and counting down). It would be a bad move to lead out the fourth round of trumps – wasting the two small trumps together. Play correctly, and declarer will make those trumps separately – let’s see how.