The Times Beginner’s Guide to Bridge: All you need to play the game
The opposing trumps drawn, declarer now turns his attention to spades. Following the unblocking principle of leading the highest card from the shorter length first when holding sequential high cards between the two hands, at Trick Five declarer leads a low spade to dummy’s king. He returns a second spade to his jack, and then cashes the ace. He has the opportunity to make a discard from dummy on this trick – can you spot the best play? Declarer can get rid of dummy’s remaining diamond. He next cashes the queen of spades, discarding a club from dummy. Say he has been counting the six missing spades as they fall (although my recommendation at this juncture is to limit yourself to counting one suit per deal – here that suit being trumps – so don’t feel a failure if the idea of having to count spades too fills you with horror); he will then know that all the opposing spades have gone. He leads his fifth-round six of spades, and it is a length winner. Rather than trump it, he discards another club.
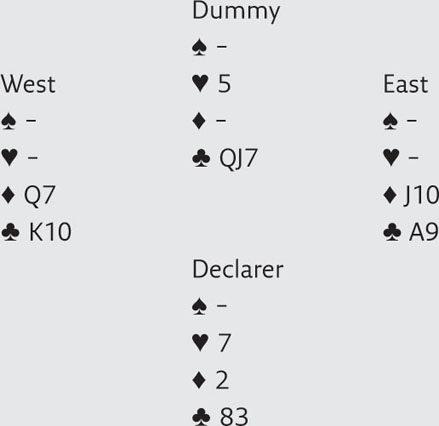
Here is the position, with declarer on lead having won the first nine tricks, and everybody left with four cards:

Declarer could simply lead out his last trump and secure his ten-trick game. But making overtricks counts extra points (albeit ‘above the line’ – see chapter 5: Scoring), so instead he leads the two of diamonds, trumping it in dummy with the five of trumps. At this juncture he has to lead a club, enabling the opponents to win their ace-king of the suit. But the last trick is taken by declarer’s remaining trump, and he has made a total of 11 tricks. Note how he scored the two remaining trumps separately.
Game made – with an overtrick.
If you remember just one thing about …
Bidding: Bid new suits at the lowest level (provided at least four cards are held), until a fit is found.
Declaring: When counting a suit (say trumps), work out how many cards are missing, and count down those missing cards, preferably thinking in terms of their likely split.
Defending: The lead of a high card (such as West’s king of diamonds) is normally top-of-a-sequence of two or more. Thus partner knows both that you have the card immediately below, and that you deny the one immediately above.
Deal B
Dealer South

The bidding:
South deals the cards and opens the bidding – One Club. West passes – although he does not need 12 points now that the bidding has already been opened, the one suit worth mentioning has been bid by an opponent, and it can’t be right for both sides to be bidding the same suit. North hates clubs, so bids his longest suit at the lowest level – in a fit-finding exercise. After North’s bid of One Diamond, East offers One Heart. His lack of points is more than made up for by his long heart suit and interesting shape. Back to South – who must bid One Spade. Why?
good to know
Do not bid a suit that an opponent has bid.
South does not know that his partner has a fifth diamond – and whether there is a fit. Furthermore, a fit in a major suit (spades or hearts) is more valuable than a fit in a minor suit (diamonds or clubs). This is because 11 tricks need to be made in order to score game (5♦/5♣), whereas only ten are required to make game in a major (4♠/4♥). So South must try One Spade – perhaps there is a fit there. He must never forget that North knows that clubs is his first-choice trump suit, as he bid them first.
Over to West, who has heard his partner overcall One Heart, indicating five+ hearts. With three-card support, West knows that his side has an eight-card fit. He bids Two Hearts. Now North. He has four-card support for partner’s spades (making a fit) so bids Two Spades. East would much rather make hearts trumps – even at the cost of needing to make nine tricks, so competes with Three Hearts. It pays to be bold with a fit, and South, using the same logic, competes to Three Spades. Everybody now passes – having bid their cards to the full.
good to know
It pays to be bold when you have a fit.
Here is the bidding sequence:

The play:
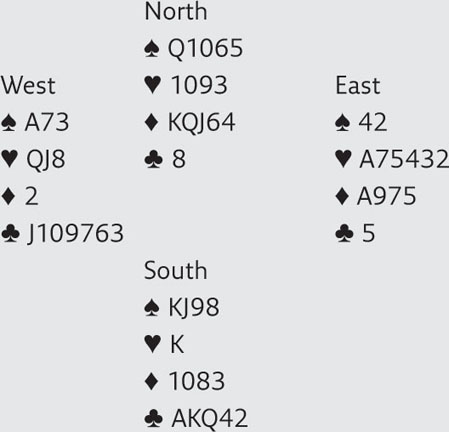
By bidding spades first, South becomes declarer (he will do this a lot in written deals – for the simple reason that it is easier to orient yourself as declarer when in the South position). West must make the opening lead, and has two good choices. He could lead the suit his side has bid and supported, hearts, and would select the queen (top of a sequence – showing the jack); alternatively, he could lead his singleton diamond, in the hope of using his trumps to trump later rounds of diamonds. Which way to go?
It is one of the beautiful uncertainties of the game that some days one choice will work out better; other days the opposite applies. But I’d probably opt for the singleton. Such a lead can be spectacularly successful, and, furthermore, West knows that he can win the first round of trumps, preventing declarer from drawing his trumps and avoiding the threat of him trumping a diamond. West leads the two of diamonds.
Can East interpret the lead correctly? He wins the ace of diamonds, and reflects that West must have a good reason not to lead hearts – the suit East bid. That reason must be that his diamond was a singleton. East promptly leads back a second diamond at Trick Two. Bingo! West trumps it. At Trick Three West switches to the queen of hearts in an attempt to put his partner on play. The lead of the queen (top of a high-card sequence) denies the king, so East plays the ace. Note that even though his partner is currently winning the trick, East knows that declarer has the king, and will win the trick unless East plays the ace. His ace fells declarer’s king (you can see that East would have ‘gone to bed’ with his ace if he had not played it at this juncture). At Trick Four East returns another diamond, and West trumps again. His ace of trumps is bound to take the setting trick.
Although play continues until the end, declarer can make all bar that ace of trumps by playing trumps, losing to the ace, drawing East’s second trump, then playing club and diamond winners. Eight tricks made, against nine bid. Down one.
Everybody is happy with this result. East-West are happy because they defeated South’s Three Spade contract. But North-South are also happy – for East would almost certainly have made Three Hearts, and it is much better to go down one than let the opponents make a contract. Points below the line (resulting from a making contract – and counting towards game) are far more valuable than points above the line which do not count towards game (see chapter 5: Scoring). Hence the expression ‘Down one is good Bridge!’.
If you remember just one thing about …
Bidding: Try to declare when both sides have a fit. Even if you go down one in your contract, it is preferable to letting the opponents make their contract.
Declaring: Play carefully to the bitter end, even if you are already down. Loss limitation is an important part of the game.
Defending: If partner makes an unexpected play (e.g. West’s failure to lead a heart), he should have a good reason (here West’s diamond is bound to be a singleton).
Deal C
Dealer South

The bidding:
South has a balanced hand (5332) with 12-14 points: perfect for a One No-trump opener. West passes: to overcall at the Two-level requires much more, both in the way of points, and strength of suit. North knows that his partnership has the values for game – but which one? Game in clubs is two more tricks than game in no-trumps, so North makes the clear-cut bid of Three No-trumps (mistaken even to mention clubs, as you know what the final contract should be).
The sequence has been brief but effective (the fewer the bids, the less chance to go wrong!):

The play:
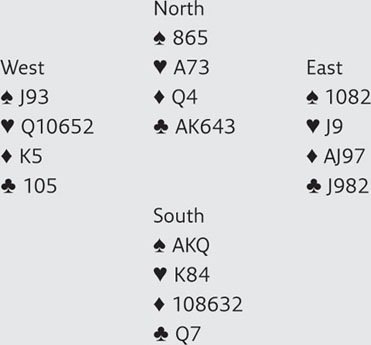
The defence must focus on length against a no-trump contract, so West leads a low heart. Declaring a no-trump contract, it is particularly imperative that declarer starts by counting up his ‘top’ tricks – the ones he can make before losing the lead. He is not going to play them all out – like our hare – but he needs to see how many extra tricks he must make. Looking at dummy’s holding in conjunction with his own in each suit, he counts three top tricks in spades, two in hearts, and three in clubs: total eight. He needs one more, and the length in the clubs offers by far the best chance. He will need to count the opponents’ clubs as they fall, but he notes that they begin with six clubs.
Declarer plays a low heart from dummy, and beats East’s jack with his king. Focusing on clubs, he cashes the queen first (high card from the shorter length), and leads a club to dummy’s king. Both follow suit twice, but when he next leads the ace of clubs (discarding a heart from his hand), West also discards (a spade). Had both opponents followed a third time, meaning that clubs had split three-three, dummy’s two remaining clubs would be length winners. But they did not – instead splitting four-two. Should he abandon clubs?
Absolutely not – you have lose to win in bridge. Declarer leads a fourth club from dummy, losing the trick to East’s jack (and throwing a diamond from his hand, as West sheds another spade). If the defenders could see each other’s hands, East would switch to a low diamond at this point, enabling them to win the king, then the ace (taking dummy’s queen), then the jack; but this would not defeat declarer as he would have the fourth round master with the ten. In practice, East is likely to return his partner’s hearts. Declarer wins dummy’s ace (note how important it was that declarer saved this card, as a way of getting back to dummy), and can now proudly lead the promoted fifth-round length winner in clubs. This is his extra trick, and now he can play like a hare, grabbing the ace-king-queen of spades, to bring his trick tally to nine. Game made.
Конец ознакомительного фрагмента.
Текст предоставлен ООО «ЛитРес».
Прочитайте эту книгу целиком, купив полную легальную версию на ЛитРес.
Безопасно оплатить книгу можно банковской картой Visa, MasterCard, Maestro, со счета мобильного телефона, с платежного терминала, в салоне МТС или Связной, через PayPal, WebMoney, Яндекс.Деньги, QIWI Кошелек, бонусными картами или другим удобным Вам способом.
Вы ознакомились с фрагментом книги.
Для бесплатного чтения открыта только часть текста.
Приобретайте полный текст книги у нашего партнера:
Всего 10 форматов